

FANUC
Recreating FANUC's Custom HMI in 5 Minutes - No Code
FANUC created a demo a couple years ago to showcase the CR-35iB and their plugin SDK. They basically have a custom HMI with several screens telling the operator what to do for each step in the process. It probably took a developer who’s comfortable with HTML, CSS, JavaScript and the plugin SDK toolchain at least a few hours to create this. We can recreate this with HMI Forge in ~5 minutes, no code.Simplifying Robotics: Mastering FANUC CRX Plugins and Timeline Editor
FANUC CRX Robots and the Timeline Editor
I contend that programming FANUC robots is easy and can be learned quickly. But what if the idea of writing code is too intimidating or you just don’t have time?
Wouldn’t it be great if you could make the robot do a job without writing a single line of code?
That’s the idea behind FANUC’s new(ish) timeline editor for CRX robots. You basically program the robot by dropping functional blocks onto a timeline. My two-year old could figure it out.
Asynchronous Part-Presence Checking (When the Robots are Too Fast)
I’ve spent a lot of time working on high-speed line tracking (iRPickTool) applications. When I first started working on them back in 2008, throughputs around 100 cycles per minute were really pushing the envelope (but this was when FANUC’s flagship high-speed picking robot was the M-430iA).
Since then FANUC has introduced a number of Delta robots: the M-1iA in 2009, the M-3iA in 2010, the M-2iA in 2013(?) and the DR-3iB in 2019. These robots are much better suited for high-speed picking applications than the articulated M-430iA arm: lighter, faster, better work envelope– great robots.
Named Variables & Constants for FANUC TP (with Fexcel)
When I first learned to program FANUC robots, I was bothered by the TP programming language. At the time I was using Ruby primarily, which, according to the official website, “has an elegant syntax that is natural to read and easy to write.”
I was annoyed that I had to manage my own memory locations for numbers, positions, I/O, etc.
Wouldn’t it be nice if I could program FANUC robots with Ruby? …or at least something Ruby-esque?
How to Diagnose FANUC Alarm Codes and Error Codes
It’s inevitable. You’re setting up your robot, programming it or running production, and you come across an alarm code that you don’t recognize. What do you do? Call tech support? Google? Read the manuals?
Based on some of the questions I’ve seen, I think a lot of people are unaware of the troubleshooting resources available at their fingertips.
Your robot probably has a ton of help files and documentation available right on the teach pendant. That eDoc CD that came with your robot is also packed with documentation gold, and there are also a couple of ways to lookup alarms online.
Four Ways to Control FANUC Robots' Speed Override
Imagine this: you have a robot that easily keeps up with its task (trust me, these applications do exist!). Like a considerate parent, you allow the robot to run at 70% which still gives it a little time to rest between cycles.
But every time you walk by the cell, the teach pendant shows a glaring 100% override. The robot works its ass off for a few seconds and then sits there motionless, waiting for the next part to come down the line.
Refactoring Skip Conditions
In my last article we talked about FANUC’s Skip Conditions: how they work, where you might use them and why they can be confusing. We also discussed the SkipJump option which may have better semantics.
Today I want to use the Skip Condition syntax as an opportunity for refactoring. We’ll work with TP parameters and their corresponding argument registers (
AR[]), side-step some argument register limitations, discuss return values and eventually create a pretty powerful two-stage search algorithm that has high accuracy without sacrificing cycle time.How to Search with a FANUC Robot Using Skip Conditions
Have you ever needed your FANUC robot to search for something and stop when it “sees” it with some sort of sensor?
There are probably 100 ways you could pull this off (macros, background logic, manipulating UOP signals, etc.), but if you’ve been programming FANUC robots for a while, your first thought is probably “SKIP CONDITIONS!” followed almost immediately by “How exactly do those work again? I remember them being kinda weird.”
How to RUN FANUC Programs Concurrently with the RUN statement
I get emails from time to time about programming FANUC robots. (Please feel free to reach out!) Every once in a while I get asked about FANUC’s multitasking capabilities:
“Can I do multitasking with a FANUC robot?”
“How do I run a background task with FANUC?”
“How do I run an aux axis independently while the robot is doing other stuff?”The short answer is yes, but there are a number of options. Which one’s appropriate depends on your use-case.
Labeling FANUC Robot IO and Data Directly From Excel
I remember when I first discovered that FANUC robots had the web-based Comment Tool. No longer would I have to endure the pain of trying to mash F1 five times just to get the letter “E”, only to accidentally get “F” due to an extra keypress. I just have to unlock KAREL, head to the robot webpage and start commenting away.
Better, but still not great.
Most of us use Excel spreadsheets to keep track of our robot data, so we still have to manually copy things over from the spreadsheet to the robot.
TP Programming With Interfaces
I worked on a palletizing project recently that required serialization. In effect, the product must be tracked through every stop of the process:
- Product picked
- Inspection passed
- Inspection failed
- Product moving to pallet
- Product placed on pallet
- Product dropped
- Product rejected
The robot simply sends a Digital Output signal to the PLC when any of these events takes place, and the PLC is responsible for sending signals on to the customer’s serialization service.
How to Write a FANUC KAREL Logging Utility
I received a question via email the other day where someone wanted to know how to log timestamped position data to a file. As luck would have it, I’d been meaning to write a post about something like this for quite a while now.
This application ends up being a great example that covers a broad range of KAREL programming fundamentals:
- KAREL variables, constants and data types
- Custom
ROUTINEs - String manipulation
- Bitwise operations
- TPE parameters
- Error-checking and the
statusconvention - File operations
- File pipes (the
PIP:device) - Data formatting
Let’s get started by considering our desired TPE interface. We want to be able to log Position Register (PR) values (X, Y, Z, W, P, R) to a logfile whenever this KAREL program is called from a TP program. For maximum flexibility, let’s accept two parameters: one will be an
INTEGERid for the PR we want to log, and the other will be aSTRINGfilename for the desired logfile.Teaching Points Backwards
I was with a customer earlier this week who needed a little help with one of their robots. It was a simple pick and place application, but for one reason or another, one of its placements had drifted and now the robot was fumbling that drop at overrides over 70%.
Pretty simple fix, right? Put the robot in teach, pick up a part and then step it through the place routine. Touch up the drop position when you get there.
Embrace the END Statement
What do you think this line of code does?
JMP LBL[9999] ;If you’ve been programming FANUC robots for a while, you probably guessed that this statement jumps to the end of the program. It comes in many variants:
JMP LBL[999],JMP LBL[10000], etc., but the intent is almost always the same: end this routine.The problem is that there’s no guarantee that
LBL[9999]orLBL[10000]or whatever actually ends the routine. That label may not even exist. You may be reasonably sure as to what will happen if you wrote the program, but I’m willing to bet that someday yourLBL[10000]won’t be the last line of your routine.Using KAREL Pipe Files
I’m currently working on a project where two separate tasks need to pass data to eachother. How do we do that in KAREL? Enter the pipe
PIP:device.The concept of a pipe has been around since the early 1970s, originating as a crucial part of the Unix operating system. Pipes simply provide a mechanism for data to travel from one process to another.
While the KAREL manual does a pretty good job of describing how pipes work and how to use them, I ran into a couple of issues while implementing the provided example. Here’s a quick tutorial showing some of the issues I dealt with along with a working example of how to use KAREL pipes.
FANUC UOP Signals & Starting Robots in AUTO Mode (2026 Guide)
You’ve finished programming your FANUC robot, tested it in T1, and now you want to run it faster. If you’re like me, you sometimes forget the details on Remote vs. Local, UOP signals and the different startup types available (RSR, PNS, Style, Other). For your (and my own) reference, here’s a quick guide on how to get things running.
NOTE: If you like this post and are interested in the programming side of things, be sure to check out my book on programming FANUC robots.
Hash Table Implementation for FANUC KAREL
I was working on a KAREL project the other day where I really wanted to use an associative array to store some
key => valuepairs. While aSTRUCTwould be appropriate if my keys were known ahead of time, there’s no data type for mapping unknown keys to values……so I built a hash table implementation that you can use in your own KAREL programs. The source is available here: https://github.com/onerobotics/hash.
Usage is documented in the README, but I thought it might be interesting/useful to talk a bit about what’s going on behind the scenes.
Isolate Your Wait Statements
Have you ever looked at a TP program and gotten lost following all the
LBLs andJMPs? Have you ever gotten lazy handling yourWAIT-statementTIMEOUTs because you didn’t want to bother adding the extra stuff to your main routine?If you’re nodding “yes” right now, you should try isolating your
WAIT-statements into their own small programs.In my eight-plus years of programming robots and troubleshooting other people’s code, I’ve found that a mess of labels and lack of refactoring large programs into smaller routines is the single biggest cause of issues.
Smart Payloads
My last project was a machine load/unload application where the robot had two basically identical grippers. Either gripper could be used to load or unload any station. Here’s how I handled the payload switching and grip/ungrip logic in the load/unload programs.Small Programs
FANUC’s TP programming environment is great for creating simple programs quickly. From the comfort of your teach pendant, you can record a few points, turn a few bits on and off and have a fully functional demo within a few minutes. However, as soon as you have to add some real intelligence to your robot, you’ll quickly find the editor to be cumbersome and slow.
I’ve already written about how I write my TP programs by hand, but here’s a quick trick I’ve been using to make my development faster and my programs a little easier to understand: tiny programs. I’m talking really small, like one or two lines.
Programming Multiple Robot Systems Effectively
When dealing with multiple robot systems, I usually find that maintaining consistency from robot-to-robot is usually the most difficult part. Simply getting backups of all your robots can be a pain if you don’t have the right tool for the job. If you’re using Windows (you probably are), just a little knowledge of the command line and the
ftputility will make your life a lot easier.The Command Prompt
If you’ve never used the Windows command prompt before, read this quick intro from the Princeton CS department.
Line Tracking - How Does it Work?
After a little digging into my records, I found that nearly 60% of the projects I’ve been involved with over the last three years have used vision and/or line tracking. It seems like integrators and end-users tend to need more help when using these options. If they’re lucky, they may have been trained by an expert somewhere, but they’re often stuck with just a manual (if they’re that lucky) to try and fix some pretty obscure bugs. A thorough understanding of how each piece of the stack fits together really helps these projects go a lot more smoothly. This post is on line tracking, but I’ll cover vision and how it fits into line tracking in future posts.How to Use BG Logic to Simplify Your TP Programs
TP programs should be readable. If an operator can step through the code and understand it, you might be able to avoid a phone call when the robot inevitably misbehaves. Lately I’ve been simplifying complex conditionals into unique flags to keep my programs short and simple.
Let’s say you have an application where the robot needs to unload one machine and then load another machine. The part out of machine 1 is hot so you want to wait until both machines are ready before unloading the first machine. You might have a line of code that looks like this:
Polish
Programming FANUC robots is easy. Giving the robots enough intelligence to run safely and reliably in just about any failure scenario is the hard part.
This is where many integrators get into trouble. They don’t plan enough programming time on the front-end so that they are forced to add polish on the production floor. If your FAT is just a day or two away and your code isn’t sprinkled with all sorts of (hopefully rarely used but thoroughly tested) error recovery routines, you’re in trouble.
When to use Tool Offsets vs. Frame Offsets
I used to be a frame offset (PR Offset) guy almost 100% of the time. Assuming you are using accurate UFRAMEs and UTOOLs, this should get you pretty far in material handling. However, once things stop being perfect and your tolerances start getting really tight, you might be better off using tool offsets in your pick and place situations.
  UTOOL_NUM=1 ;
   ;
  ! pick product from fixture 1 ;
  UFRAME_NUM=1 ;
  L P[1:pick] 1000mm/s CNT100 Offset,PR[1:pick approach] ;
  L P[1:pick] 250mm/s CNT0 ;
  CALL GRIP ;
  L P[1:pick] 500mm/s CNT100 Offset,PR[2:pick retreat] ;
   ;
  ! place product on fixture 2 ;
  UFRAME_NUM=2 ;
  L P[2:place] 1000mm/s CNT100 Offset, PR[3:place approach] ;
  L P[2:place] 250mm/s CNT0 ;
  CALL UNGRIP ;
  L P[2:place] 500mm/s CNT100 Offset,PR[4:place retreat] ;
This works great when you can approach and retreat from your fixtures in an orthogonal or parallel direction, but what happens when your part doesn’t sit quite perfectly in the fixture? What if your user frame isn’t perfectly accurate? Time to use a tool offset.
Writing TP Programs by Hand - Pros and Cons
FANUC’s TP programming language and the teach pendant’s built-in editor are great tools. They allow relatively novice programmers to get up and running very quickly. Teach a couple points, throw in a couple labels andIFstatements, and you’re off to the races. However, anyone who’s tried to do anything a bit more complex quickly realizes how cumbersome programming on the teach pendant is. Navigating through multiple levels of menus to find thePAYLOADinstruction or creating an extensive mixed-logic conditional is really painful. At this point many programmers switch to programming.LSfiles by hand.Backup Tool for FANUC Robots
The process of sticking PCMCIA memory cards (or now USB sticks) into each one of your controllers, going to the FILE menu, creating directories, Backup > All of the above, etc. is a huge pain. I felt this pain very sharply when working on an 18-robot line years ago.
BackupTool allows you to concurrently backup all the robots on your project to your PC with a single command.
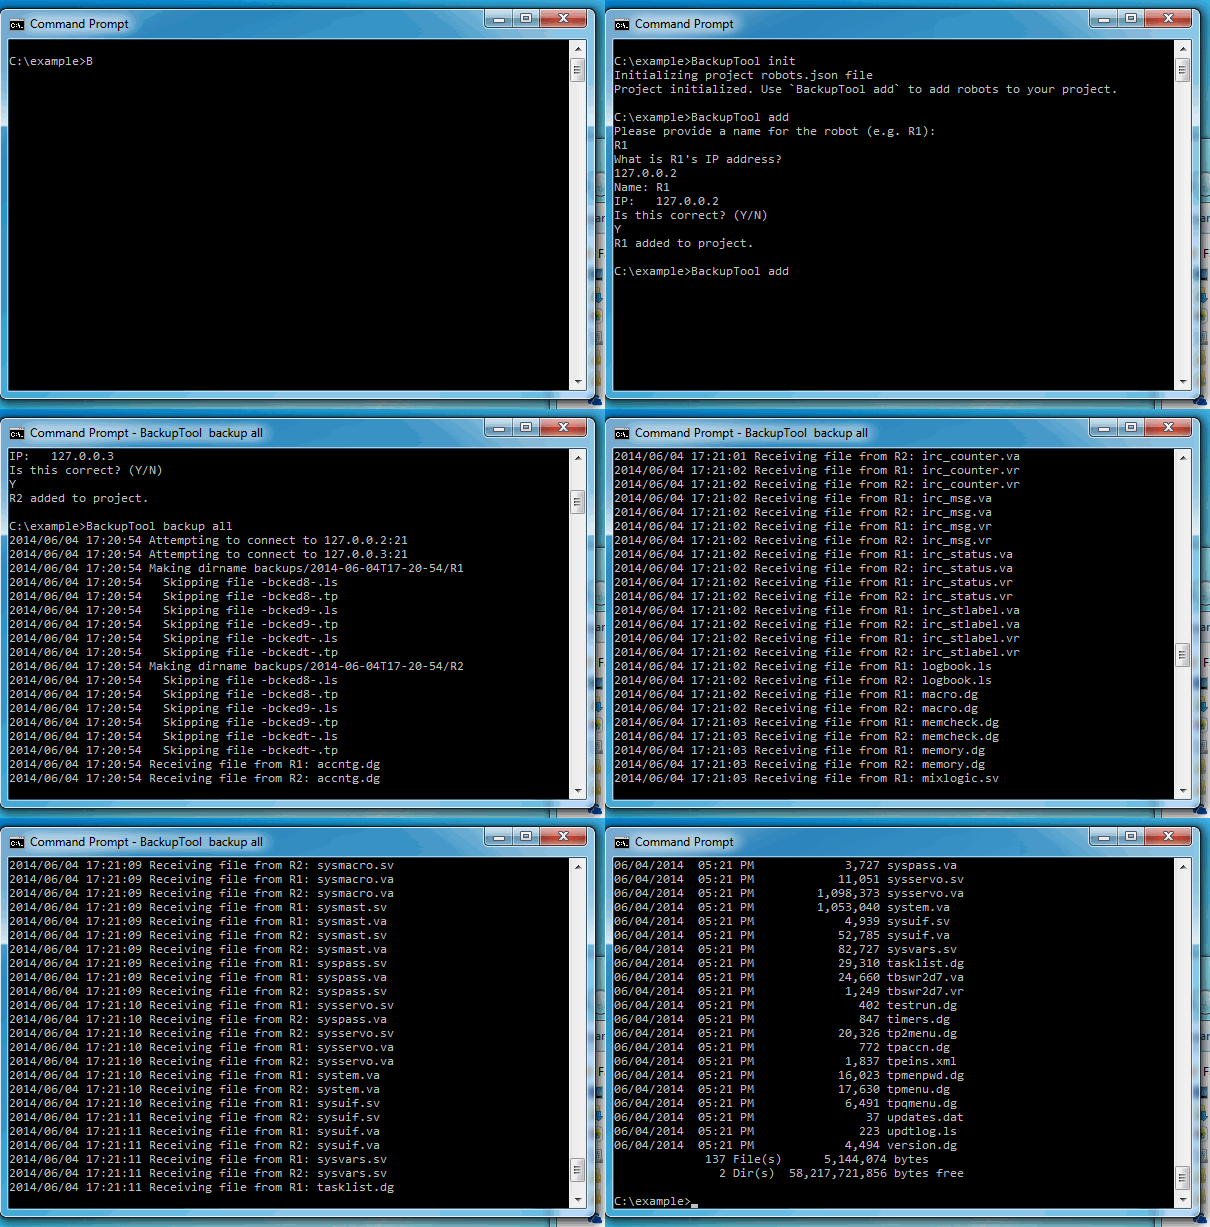
Download BackupTool v0.0.1 for Windows 64-bitRobot Work Envelope Considerations
Put your robot in a good spot or suffer the consequences. It may seem obvious, but the best programming in the world may not be able to save a system where the robot has to struggle to get from point A to point B.
Palletizing
One of the first problems I had to solve as the newly appointed M-410iB product manager back in 2008 was where both an end-user and an integrator were blaming FANUC for overheat and throughput problems. “You claimed that this robot could do 28 bags per minute,” the integrator exclaimed. “We can barely do 20 without getting J2 overheats. We bought the fan kit and everything… this must be a faulty robot.”
Visual Line Tracking is Hard
I spent last week helping an end-user with their two-robot visual line tracking system. As far as systems like these go, this one’s pretty simple: just two robots, one backlit conveyor, one camera and basically one product. The entire codebase comes in well under a thousand lines. We had issues that were hard to solve despite the simplicity. What follows is my process while debugging several common visual tracking errors.Simulating TP Programs in the Browser with tp.js
Last week I wrote about Testing TP Programs with Ruby, but you had to trust that I wasn’t just making things up. Over the past few days I’ve ported most of my work into a JavaScript library so you can actually see TP programs running directly in your web browser.
Let’s cut to the chase and do an example. I’ve written a simple TP program below that performs a few basic functions like numeric register assignment, conditional evaluation, jumping to a label and linear motion. Next to the program, I’ve created a simple debugger which gives you some insight into how the program is running and what’s happening to the numeric register.
Testing FANUC TP Programs with Ruby
I’ve written about testing before, but I still can’t get over the fact that the state of the art method for testing multi-million dollar industrial robot cells is trial and error. That’s why I’ve started working on an environment for reliably testing FANUC TP code.
I’ve basically written a Ruby gem to correctly parse, interpret and execute TP programs within a simulated runtime. With this environment I can use any of Ruby’s great testing tools to make sure the robot does what it’s supposed to do.
KAREL syntax highlighting for vim
I just open-sourced my KAREL syntax highlighting plugin for vim.Introducing KUnit: a simple unit testing framework for FANUC's KAREL programming language
I’m happy to share a real open source project that I’ve been working on: KUnit. The source code is available on GitHub: https://github.com/onerobotics/KUnit.
Coming from a Ruby background where automated unit testing is common-practice, it’s frustrating to come work on a robot where tools for automated testing don’t exist. No matter how careful I am when making changes to my code, I always feel a little bit exposed without a comprehensive set of unit tests making sure I didn’t break something. I haven’t come up with a solution for automating TP program testing, but here’s a tool you can use to make sure your KAREL programs are doing what they are supposed to do.
Intelligent Traversing
I’ve been working on several machine-tending applications lately. These projects tend to get complicated quickly as the robot decides where to go next based on the state of the peripheral equipment. The decision-making logic is hard enough, but getting the robot to and from each station safely can be tricky. This is how I handle it.
I start off by defining a list of stations:
- Home
- Inbound parts
- Regrip station
- Machine 1
- Machine 2
- Reject station
- Inspection station
- Outbound parts
I then define a register for saving the robot’s current location. I’ll typically also add another register for saving the previous station, just in case I need it.
Writing Maintainable TP Code
Continuing with last week’s theme of best-practices, I’d like to discuss what makes certain programs maintainable and others impossible to work with. Eliminating as much jumping as possible is a good start, but there are a few other rules I always try to follow when working on a project.
1. Keep Programs Short and Focused
FANUC’s Teach Pendant doesn’t have much screen real estate. The default editor can only display 11 lines of code (LOC), and you only get 20 in the Double or Single Wide modes. That means that if you need to troubleshoot a 200 LOC routine on the floor, you can at best only see 10% of the program at any given time.
TP Syntax Highlighting with Pygments
You have noticed that the snippets of TP code in my previous posts now have pretty colors. I created a custom fork of GitHub’s pygments.rb that adds a lexer for FANUC TP. I’m going to maintain and improve this custom fork for a while until the lexer is a bit more complete, then I will see about submitting the patch to the official Pygments project.
Here’s an example:
/PROG EXAMPLE /ATTR OWNER = ASCBIN; COMMENT = "Example TP file"; PROG_SIZE = 2651; CREATE = DATE 14-01-02 TIME 10:12:44; MODIFIED = DATE 14-01-02 TIME 10:12:44; FILE_NAME = ; VERSION = 0; LINE_COUNT = 21; MEMORY_SIZE = 3195; PROTECT = READ_WRITE; TCD: STACK_SIZE = 0, TASK_PRIORITY = 50, TIME_SLICE = 0, BUSY_LAMP_OFF = 0, ABORT_REQUEST = 0, PAUSE_REQUEST = 0; DEFAULT_GROUP = 1,*,*,*,*; CONTROL_CODE = 00000000 00000000; /APPLLINE_TRACK; LINE_TRACK_SCHEDULE_NUMBER : 1; LINE_TRACK_BOUNDARY_NUMBER : 1; CONTINUE_TRACK_AT_PROG_END : TRUE;
/MN 1: ! Example comment ; 2: ; 3: LBL[1] ; 4: R[1:Some Register]=1 ; 5: DO[1:Some Output]=ON ; 6: ; 7: CALL MY_SUBROUTINE ; 8: ; 9: IF R[2:Another register]>=3,JMP LBL[999] ; 10: ; 11:L PR[1:Some PR] max_speed CNT20 VOFFSET,VR[1] ACC R[100] ; 12: ; 13: UTOOL_NUM=5 ; 14: //PAYLOAD[2] ; 15: ; 16: F[1]=(OFF) ; 17: ; 18: WAIT .20(sec) ; 19: JMP LBL[1] ; 20: ; 21: LBL[999] ; /POS /END
Don't Jump Around
I hate to disagree with the wise words of House of Pain, but excessive jumping around is the most common issue I see when reviewing others’ TP code. Labels and jump-statements come natural in a language that doesn’t support actual code-blocks for simple if-statements. Within just a few minutes of programming, a beginner sees an
IF (...),JMP LBL[X]and decides that this is how FANUC programming is done.Randall Munroe from xkcd sums up the potential for catastrophe when using GOTO statements (TP’s JMP) in this comic:
Your First Visual Tracking Application Part Two
In part one of this series, we covered gripper design and testing, vision considerations, robot selection, cell layout and choosing the correct number of robots for visual tracking applications. This post will cover some other considerations: conveyor flow, hardware requirements, setup and configuration, and finally, programming.
Here’s the full list with links to each section:
- Gripper
- Vision
- Robot Selection
- Layout
- Number of Robots
- Relative Conveyor Flow Direction
- Hardware
- Setup
- Programming
Relative Conveyor Flow Direction
If you consider a simple system with two conveyors: one for parts coming in, and one for parts going out, which direction(s) do they go? Do they both move in the same direction, or do they oppose eachother?
FANUC TP Syntax Highlighting for Vim
Vim is my favorite text editor. It may take an hour or two to get over the initial learning curve (and probably years to master it), but it’s worth it. The ability to cruise through your code and change it quickly without ever touching a mouse saves a ton of time, and there are plenty of good resources for learning it.
You can grab my syntax highlighting file on GitHub. Pull requests appreciated.
Your First Visual Tracking Application - Part One
Visual tracking is intimidating, much more intimidating than most other material handling applications. With all the additional hardware required (cameras, encoders, multiplexers) and steps to get things moving (camera calibration, tracking frame calibration, vision process creation, reference setting, accuracy tuning), it’s easy to get overwhelmed. And you haven’t even made any of your other extremely important decisions yet: what robot(s) should I use? What is the best layout for this application? Should I use parallel flow or counterflow? What type of gripper should I use? Can I get away with a single-pick gripper, or should I design one that picks two at a time? Should I use PickTool, or should I write it all from scratch? Lots of questions, difficult answers.Intro to FANUC Background Logic
FANUC’s Background Logic feature is basically the ladder-logic you know and love in TP Program form. These programs only consist of Mixed Logic statements (e.g. F[1]=(DI[1] AND DI[2])), and the programs are constantly scanned in the background while your robot is online, ignoring all E-Stops, alarms, etc. Depending on the complexity of your system, you may be able to skip the PLC and simply use BG Logic to control everything.FANUC KAREL Programming: An Introduction (with Examples)
You can program FANUC robots in two different languages: the TP (teach pendant) programming language or KAREL. TP is good enough for 99% of the things you need to do on the robot, but for everything else, there’s KAREL.
KAREL is a lower-level language very similar to Pascal. It features strongly typed variables, constants, custom types, procedures, functions, and gives you access to all sorts of useful built-ins for things you may not be able to do with TP. (By the way, if you’re interested in TP programming, please check out the book I wrote on programming FANUC robots.)
Testing FANUC TP and KAREL Code
UPDATE 2014/02/27:
If you're looking for a how-to guide on FANUC KAREL programming, you're probably better off reading my Introduction to KAREL Programming article.
One of the things I love about the Ruby community is its dedication and support for testing. Having very little formal computer science education, concepts like unit testing and integration testing were completely foreign to me. After first ignoring everyone’s advice to test now and test often, I eventually forced myself to learn out of necessity and now advocate the practice to anyone who will listen. Having confidence in your code is very important, especially when your code is the only thing keeping a $100k robot from crashing through a $500k machine tool. By testing thoroughly, it’s much easier to have confidence in your code and gives you the freedom to perform large refactorings while still maintaining essential functionality.
AP_LD and RT_LD Functions
If you’ve ever worked on a robot with the Constant Path option, you’ve probably seen these funny motion segment modifiers and wondered what they were for.
AP_LD and RT_LD stand for “Approach Linear Distance” and “Retreat Linear Distance.” They guarantee the last (or first on a retreat) Xmm of a given motion segment to be linear. This can be very useful when you need to avoid an obstacle or make sure your motions are not rounding off too soon.
To ACC or not to ACC
That is the question. And the answer is “probably not.”
Once a programmer learns that the ACC instruction exists (and figures out how to make it go over 100) this is often the first place they go to make the robot faster. It’s such an easy change to make with immediate results, but there are serious consequences. I’d argue that going over ACC100 should only be done as a last resort.
Using Conventions to Improve Your Workflow
As a contract programmer, it’s important for me to be as efficient as possible. Coding faster saves my clients money and allows me to move on to the next project quicker. Over the years I’ve developed quite a few tools and habits that help me do more work faster.
Conventions
I picked up Ruby on Rails back in 2007. One of the things I really like about it is its liberal use of convention over configuration. By defining conventions for things that always come up, you don’t have to waste any time or energy developing solutions for them.
Using FTP for Increased Productivity
One of the easiest ways to save time while working on a FANUC robot is to become familiar with an FTP client. The addition of the USB port on the Teach Pendant helped bring most people out of the dark ages of lugging PCMCIA cards around (although many people still use them), but even USB sticks aren’t the fastest way to get files to and from your robots.
For those unfamiliar with the concept, FTP stands for File Transfer Protocol; it’s basically a method for getting files from one computer to another. One computer (like the robot controller) runs an FTP server and waits for FTP clients (like your laptop) to connect and issue commands. You have commands for getting a list of files, downloading files, uploading files, creating directories, etc. As long as your laptop is on the same network as your robot, you’re good to go.